
Summary
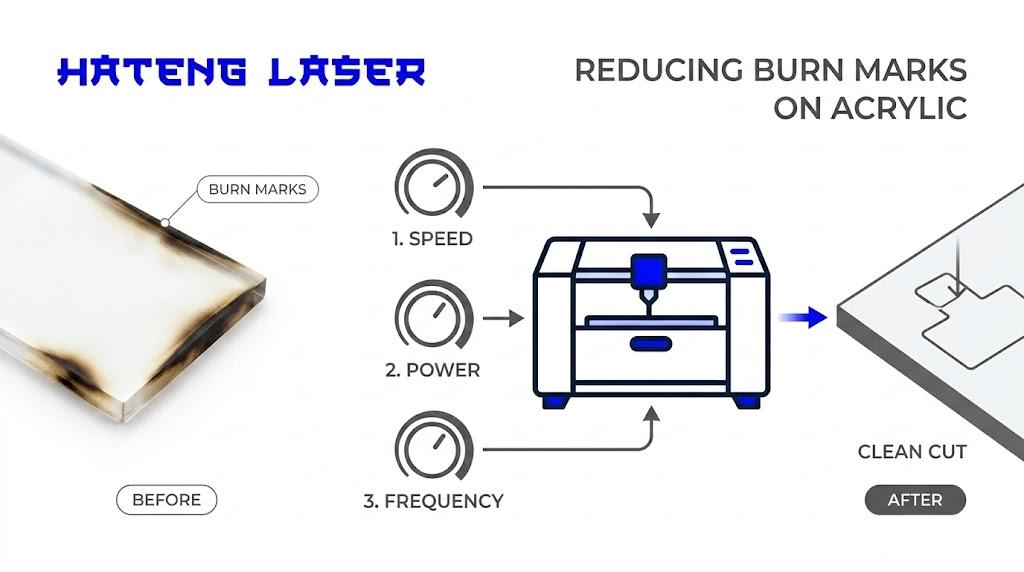
Start by lowering power and increasing speed. Acrylic marks best with low power, because high power distorts it fast. If you are using a fibre laser, the issue may be the machine type, not just the settings. Fibre is less effective on plastics, while CO2 suits acrylic better. Move the focus slightly away from the surface for a softer mark. Lowering focus by about 1/16 inch for acrylic engraving. Use air assist and strong exhaust. Air assist greatly reduces flaming on acrylic.
Introduction
Hateng’s HLF130 runs on 220V AC with under 800W input power. That tells you the machine is compact, but it does not mean acrylic will behave well. Material fit matters more than raw power.
That is the part many users miss. Acrylic burns easily when heat stays in one place too long. So the problem is usually too much energy, too much dwell time, or the wrong laser source.
This guide shows the exact settings to change, what to test first, and when a laser hatang style fibre machine is simply the wrong tool for acrylic. It also helps if you are using a table top marking machine in a Mumbai or Bhiwandi workshop.
Why is your acrylic burning in the first place?
Acrylic is sensitive to heat. High power levels tend to distort acrylic, and its engraving guidance recommends low power and high speed instead.
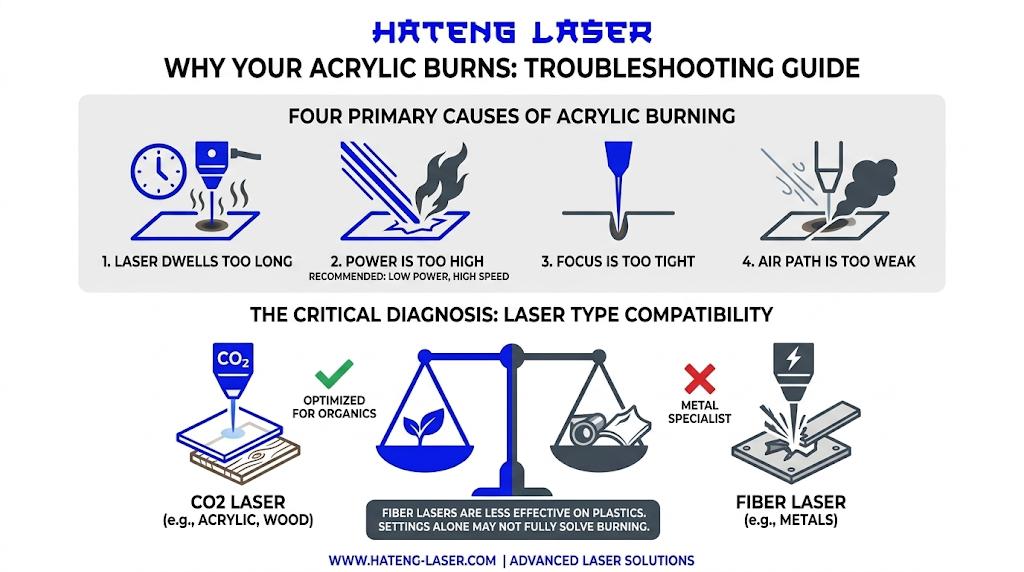
The burn marks usually come from one of four things. The laser stays too long in one spot. The power is too high. The focus is too tight. Or the air path is too weak.
There is also a source issue. Fibre lasers are the metal specialist and are less effective on plastics. Moreover, CO2 lasers are the organic-material option, including acrylic.
So the first job is diagnosis. If you are using fibre on acrylic, settings alone may only reduce the damage. They may not fully solve it.
Which laser settings should you change first?

Start with the simplest fix. Lower power first. Then raise speed.
Here is a clean starting checklist.
- Reduce power until the mark stops browning.
- Increase speed so heat has less time to build.
- Test one pass before adding another.
- Use a scrap piece first. Test settings on scrap acrylic.
If the acrylic is painted on one side, start with the same speed as clear acrylic. Only increase power by about 10% to engrave through paint. More power can melt the coating.
If you are on a tabletop marking machine, make one small sample file. A tiny test square saves time, material, and frustration.
What focus and airflow settings help most?
Focus is a big deal on acrylic. Set the focus slightly further from the lens than normal. It suggests lowering the focus by about 1/16 inch to soften the engraving and blend the raster lines better.
That small change can reduce the harsh edge that often looks like a burn line. It also gives a smoother frosted effect on clear acrylic.
Air assist also matters. Air assist greatly reduces flaming when cutting acrylic and should always be used for that material. It also warns that acrylic is flammable.
Use this setup order:
- Clean the lens and bed first.
- Keep the protective film on the front side. Remove only what you need.
- Mirror the artwork if engraving the back side.
- Turn on air assist and strong exhaust.
A clean airflow path matters more than many users think. Smoke trapped near the beam can darken the acrylic surface and make a good setting look bad.
Is a fibre marking machine the right choice for acrylic?
Often, no. Fibre lasers are best for metals. CO2 lasers are better for acrylic, wood, leather, paper, and other non-metals.
That is the key issue behind many burn marks. A fibre laser can mark some plastics, but acrylic is not its strongest material. Hateng’s own comparison says fibre is less effective for plastics because of low absorption at 1064 nm.
| Machine type | Best material fit | Acrylic result |
| Fibre laser | Metals, some plastics | Often burns or distorts if settings are wrong. |
| CO2 laser | Acrylic, wood, leather, paper | Usually cleaner and smoother. |
| UV laser | Heat-sensitive materials | Good for delicate, precise marking. |
If your work is mostly acrylic signage, gifts, or clear branded panels, the machine type matters more than the next power tweak. That is why a marking machine choice should start with material, not price.
How should you test your table top marking machine safely?
Use a controlled test, not a full production job. Try settings on a scrap piece of acrylic before running the final file. That avoids wasting stock.
Start with a small grid of tests. Keep speed high and power low. Then adjust one variable at a time. Do not change three settings together, or you will not know what fixed the burn.
A practical test sequence looks like this:
- Run a low-power, high-speed sample.
- Slightly reduce focus.
- Turn on air assist.
- Inspect edge darkness and surface haze.
- Repeat only if needed.
When should you stop adjusting settings and change the machine?
Stop chasing settings when the material fit is wrong. Fibre is the metal specialist, while CO2 is the correct fit for acrylic and other organics.
If the acrylic still browns after lowering power, increasing speed, and improving focus and airflow, the better fix is a different source. That may be CO2 for most acrylic work, or UV for heat-sensitive precision work.
That is the honest answer. Settings help, but they cannot override physics. A good machine setting can reduce burn marks. The right laser source can prevent them in the first place.
What should you do next?
Check three things first. Are you engraving the front or back? Are you using low power and high speed? Is your machine actually a fibre source on acrylic? Those answers will usually explain the burn marks.
If you are using a Hateng laser for acrylic, ask for a material demo on scrap pieces. That is the fastest way to see whether a table top marking machine, a CO2 setup, or a different marking machine will give the finish you want.
Book Demo.